22 August 2014

Last Thai beauty update


Hi girls! My nails are way too long. I have let the vacation nails go overboard and typing isn't easy! Still rocking the green French mani, will change at home. But I have had a last pedicure last night. Went to our fav foot massage spot, and it turned out to be a good choice. Pedicures always vary on Khao San and Rambuttri, and even in shops are non-consistent. Even the same person is non-consistent!!


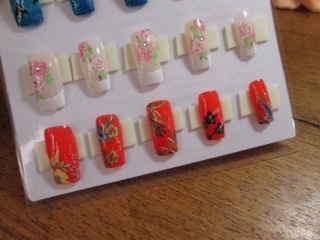
Also, nail art is - believe it or not - rare. But last night I had a woman who did nail art and she asked me if I wanted flowers. Why not?! I brought my own polish with me (including top coat, last pedi NO top coat!) as often the colours they have are 1) red, 2) red or 3) almost empty and goopy. These are two new no name Thai polishes is a great chocolate brown (so hard to find) and an OPI Czechbook blue. She is self taught and uses an eyeliner brush directly out of the polish bottle. Really not bad. We talked shop a bit and she also struggles. She says that everyone wants cheap cheap but nail art takes time and effort. No one wants to pay. I paid double the pedicure price (so an additional 150B or nz$6 for the art) and that is super cheap. Thailand is a much different economy, but how can a Westerner balk at that price? That is my worry, too. No one will want to pay for art, but want to have it. Time will tell, keep being positive!!! I am really looking forward to my new offerings and path.


I found some more polish and this is my last haul. I have lost count to how many I bought as they are stashed in different compartments of my pack. Waiting for me at home will be some new Gelicious shades for gel manis, a NZ indie gorgeous green Peacock Pie and some new China Glazes.


I had to buy more Thai flower pots! Too cute! I had a coral one on my toes for the past week, fairly good consistency. I bought the white one just because it looked like a milk bottle! I think I have every colour available!! Or, at least, that I found.


Then I bought these no names as the polish has good coverage and is saturated. The chocolate brown is great! On the hair front, last wash this morning. The last days have been very humid. I really didn't wash my hair on the island. Just kept getting it wet and scrunching through with product. Worked and looked OK, but am happy that things are cleaner now!
Travel home this evening to the cold - looking forward somehow. Miss home, have new plans - life is good!!!!

7 August 2014

Thai Manshong blue with hand drawn flowers


Hi girls. Did a new mani! All by my alone, too!  The Mr. decided to go watch rugby and I stayed in the bungalow to do my nails. Ahhhh, perfect evening for both! Rugby is fine, don't get me wrong, but nails were more important!


My old mani was on its 12th day and had finally given up its steam. I did absolutely nothing to them for 12 days, so am pretty impressed at the result. I removed and then did a two coat base of a new Manshong blue.


I intentionally traveled with no polish as I knew I c(w)ould buy here (only brought base and top coat, and one glitter). First base was CG adhesion base coat, then two coats of the blue. A very robin's egg blue. Bright, cheerful. Top photo is outside natural light, bottom indoor. Pretty shiny cream, too. No cuticle clean up as I did not bring brushes with me and my brushes here are for painting only!


Then I set up my acrylics on a very poor low rattan table under some very poor light! I went for Polynesian hibiscus in coral red and yellow. In a "normal" environment I would probably have painted more flowers, but my back started to give out because of the super low table. This is definitely evident on my right hand (below).


Using your non-dominant hand is always "involved" but made worse under poor working conditions. I managed something, though. I top coated with Out the Door, and done! Personally I really like the coral on bright blue combo. Looks happy and island-y. Let's see how long this mani lasts!!
Bye ya'll!

6 August 2014

Graduation nail (art) school

I


I am proud to announce I have finished my training and am now a certified Hand Painted Nail Art and Manicure technician! I did my graduation mani on my teacher, Severine. I was nervous or anxious, don't know. I thought about the design all night it seemed. You know, you have an idea but are unsure if it will turn out. And on a real person it is really important!


When I got to the studio it was very busy so I decided to make a display set with my idea while I waited for Severine. I knew I could use the "good polish"! So looked through blues and decided on a skittlette base of thumb (one coat OPI Keeping Suzi at Bay, topped with a China Glaze dark blue jelly glitter), index-middle (two coats Suzi) and ring-pinkie (two coats OPI Dining al Frisco). I canned the thumb idea for the real mani as the CG glitter was too old and basically useless. That is why I have forgotten the name! So the thumb in the real mani is Suzi.


Then I drew vertical lines in light blue, grey and white. The flowers are in two shades of pink with grey stamen/pistil and a white dot. As a signature accent I chose pink hearts with two darker hearts to represent her children. Seche Vite sealed the deal. I could not do any cuticle clean up as there was no non-acetone remover and the acetone would have ruined her acrylic tips (I did not do those!). But the lines were pretty neat. The mani turned out exactly how I envisioned it, so am very happy about that!


Since I had to wait quite a while I also did a quick snowflake type "inexpensive" nail design, and a silver fern. I couldn't really finish the silver fern as in the middle of it 1) Severine was ready to start and 2) her son knocked over the lamp and caused me to blur some leaves. But I kept it, but will probably do another for display. At home I would add some black holo polish to give the frond depth.
So that was my intensive course! Usually the course lasts a month with less hours a day and time off. But I didn't have that much time, and am pretty dedicated and disciplined when I set my mind to something. Of course, continual practice and mani experience is key but I feel I have a solid base of technique to get me going. This is a very affordable course in a country known for nail art. So..... If you are ever in Thailand, I highly recommend Severine!! The Nail Studio Pai (http://www.painailstudio.com).
Big hugs from me!! And ciao girls for now!


4 August 2014

Eighth day nail art school


Hi girls! This is my second try at writing this. There is no internet so am writing offline but lost the first draft into some black hole of who-knows-where. Today, it seems, all I did was vertical lines. Practicing lines. Once you get the hang of it, it flows. It was my last display set today and I used lines.


I started with a base of Revlon Flirt, a candy type purple. Did the pinkie first and this would be a fab mani on its own: vertical stripes with flowers on top. (BTW notice how the Seche Vite caused shrinkage? Interesting...) I like this the best. In fact, from pinkie to middle I like and would make great accent nails or full manis. Am on the fence regarding the index finger, probably because of the white line. Might look better without. And the thumb started as a side French but got boring and now looks like I came too late to the World Cup Brazil party!


I did two pedi toe nail sets as well. The first used my own newbie Manshong turquoise blue! I also added a diagonal gradient green using a tiny piece of car sponge!


This looks a lot better in natural light. The turquoise-coral combo looks good and the yellow in mid flower is definitely noticeable. Didn't add any leaves this time. Really is very pretty. My second set was done directly on the white nail as it was getting really late and I wanted a French type display.


Each tip is in a different candy shop colour going diagonally in alternating directions. These were covered in navy blue and red "sparks" from the alternating sides. Cute and pop-py. So, another super big day. Tomorrow is my last "graduation" day and I will recap as well then.

3 August 2014

Seventh day nail art school


Today was another long day, and a solo day. Was on my own. After warm up I finished my French bridal set. Added some light green leaves and rhinestones. I also added another light nude base on the under side of the clear display tip. Normally on a client I would have applied a soft nude to start and even out the nail bed.


The top coat evened out the white tip and roses. I am very happy with these. And, as usual, everything looks better from a distance. The studio LED lighting is harsh. Then I was to do another set with some flowers. I decided, since I had basically all day, to do a different floral idea on each nail. That could give clients some ideas.


I started with a base of Revlon Marmalade (ah! Finally a name!). A bright summery orange. Starting with the thumb, I kept updating my colours in different levels of depth to work on each nail. I think they all look like Hawai'ian shirts! Must admit, by the time I got to the pinkie nail I was a bit over it! Some have glitter specks, I kept one more monotone. Again, look great at normal arm's distance! Below are some detail pics of the nails. So girls, tomorrow is another day. Eyes are tired tonight.


1 August 2014

Sixth day nail art school


Hi girls! Another full on day, and I didn't finish completely. After warm up I started in on new designs. Practiced on my pad before starting the first set. On the to-do list was a gradient with dolphins and palm tree. Neither are on my personal hit list but, hey, you'll never know what clients want.


The gradient is acrylic paint instead of polish, using a car sponge! Made for a very uneven surface, a polish base would have been helpful. And a smaller sponge. But who am I to question the schooling?! I added a glitter and top coat before continuing. Then the base of the dolphins and tree were drawn in black. The tree is a multipart endeavor for the feathering. It's a tad large, too.


White was added to the dolphins and then top coat. When dry the set goes on my board and I start a new set. Next on the list was freehand French as a bridal set using roses and rhinestones.


I ended up using white acrylic for the tips as the white polish was well beyond its use-by date, way too thick. Also, I would have applied a nude base before but, again, what do I know?! You can't top the white tip too much otherwise the tip is no longer white. Duh. So my design in the end will suffer but I think people will get it. My tips are nice, though, even and clean with simple strokes.


They were topped with a pale pink (I secretly topped up the white again, even though they thought it looked good). Then I started my roses. One each in white, then a fill in with different levels of pink. Then a second pink. Then time was up so I will finish tomorrow with leaves, pale background flowers and rhinestones (though I did place a couple of stones). Bye for now! x


Related Posts Plugin for WordPress, Blogger...