over 50 but still glam, channeling the inner girl with creativity, nail polish, long greying hair, a smile and a love of life.
Showing posts with label French. Show all posts
Showing posts with label French. Show all posts
23 April 2015
52wkCrumpet30: Indie
This is week 30 of Crumpet's 52 week challenge! The "rules" are very flexible and you have all week to accomplish the mani. As always, must be done on your own nails, using the colours suggested (or parts thereof).
This week's prompt: Neon and Indie (either each alone or combined). Since there is a neon prompt next week, I chose Indie polishes and created an Anzac Day skittlette mani for this holiday weekend.
That base is a natural gel. The white is Mayonnaise from ManGlaze. I love this white and hardly use it as I only have one bottle. You can only buy it in the States and they do not ship overseas. The white has a gorgeous shimmer to it and dries matte. But the top coat really brings out the shine! I wish I could get another bottle as this one is getting low.
The red is piCture pOlish Frank-n-Furter from their Rocky Horror collection. A great tomato blood red. The tips are freehand, the poppies are a mixture of Frank-n-Furter and white and dabbed on. Basic black for the lines. I am set for the Anzac Day weekend – don't know if I will be up at dawn, but we will remember.
16 December 2014
52wkCrumpet12: glitter topper (alright then, Frozen for adults!)
This is week twelve of Crumpet's 52 week challenge! The "rules" are very flexible and you have all week to accomplish the mani. As always, must be done on your own nails, using the colours suggested (or parts thereof).
This week's prompt: crinkly tape, and glitter topper (either each alone or combined). I chose glitter topper as I had an idea for snowflakes and a Frozen type adult mani. A bit of inspiration again from Queen Robin but also from heaps of other artists out there who are doing snowflake manis. And I really didn't have any ideas for crinkly tape.
I started with a one coat base of OPI Bubble Bath. I purposely did not want a French tip base as that would have been too stark and white. Only from the cuticle edge I swept up a coat of LA Colors Sheer Passion. This is (horrors ick!) a frosty pearly pink white. This gave the Bubble Bath an edge without being too opaque.
Then I added a glitter gradient from the tips inward of OPI Pirouette my Whistle and China Glaze Ray-Diant. Pirouette is a very tender feminine silver and white glitter while Ray-diant is coarser and has aspects of gold and silver. I tread very lightly and just skimmed the surface, going over a couple of times. Then I top coated with Out the Door and let it sit while I got my white paint ready.
 |
| right hand |
I really like this mani, it is soft but also festive without being a major Xmas tree on your nails (though nothing wrong with that!). I could also see the idea as a bridal mani, maybe with flowers or roses instead of snowflakes - unless you have a winter wedding! And, yes, I am totally aware that this looks like Frozen (the Mr pointed that one out). Man, I need to let that one go.
If I were to do it again, I would add more glitter to the tips to cover up the natural nail colour. Or maybe first apply a very light-touched silver as the base. Ah, live and learn! Happy Holi-Nights!
4 August 2014
Eighth day nail art school
Hi girls! This is my second try at writing this. There is no internet so am writing offline but lost the first draft into some black hole of who-knows-where. Today, it seems, all I did was vertical lines. Practicing lines. Once you get the hang of it, it flows. It was my last display set today and I used lines.
I started with a base of Revlon Flirt, a candy type purple. Did the pinkie first and this would be a fab mani on its own: vertical stripes with flowers on top. (BTW notice how the Seche Vite caused shrinkage? Interesting...) I like this the best. In fact, from pinkie to middle I like and would make great accent nails or full manis. Am on the fence regarding the index finger, probably because of the white line. Might look better without. And the thumb started as a side French but got boring and now looks like I came too late to the World Cup Brazil party!
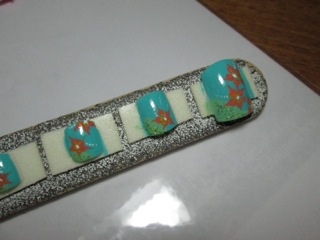
I did two pedi toe nail sets as well. The first used my own newbie Manshong turquoise blue! I also added a diagonal gradient green using a tiny piece of car sponge!
This looks a lot better in natural light. The turquoise-coral combo looks good and the yellow in mid flower is definitely noticeable. Didn't add any leaves this time. Really is very pretty. My second set was done directly on the white nail as it was getting really late and I wanted a French type display.
Each tip is in a different candy shop colour going diagonally in alternating directions. These were covered in navy blue and red "sparks" from the alternating sides. Cute and pop-py. So, another super big day. Tomorrow is my last "graduation" day and I will recap as well then.
3 August 2014
Seventh day nail art school
Today was another long day, and a solo day. Was on my own. After warm up I finished my French bridal set. Added some light green leaves and rhinestones. I also added another light nude base on the under side of the clear display tip. Normally on a client I would have applied a soft nude to start and even out the nail bed.
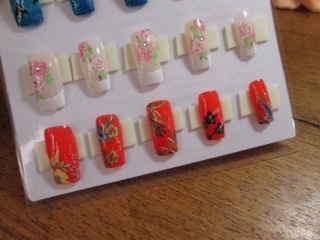
The top coat evened out the white tip and roses. I am very happy with these. And, as usual, everything looks better from a distance. The studio LED lighting is harsh. Then I was to do another set with some flowers. I decided, since I had basically all day, to do a different floral idea on each nail. That could give clients some ideas.
I started with a base of Revlon Marmalade (ah! Finally a name!). A bright summery orange. Starting with the thumb, I kept updating my colours in different levels of depth to work on each nail. I think they all look like Hawai'ian shirts! Must admit, by the time I got to the pinkie nail I was a bit over it! Some have glitter specks, I kept one more monotone. Again, look great at normal arm's distance! Below are some detail pics of the nails. So girls, tomorrow is another day. Eyes are tired tonight.
Labels:
bridal,
display set,
flowers,
French,
nail art school,
roses,
Thai
1 August 2014
Sixth day nail art school
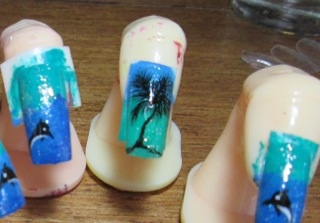
Hi girls! Another full on day, and I didn't finish completely. After warm up I started in on new designs. Practiced on my pad before starting the first set. On the to-do list was a gradient with dolphins and palm tree. Neither are on my personal hit list but, hey, you'll never know what clients want.
The gradient is acrylic paint instead of polish, using a car sponge! Made for a very uneven surface, a polish base would have been helpful. And a smaller sponge. But who am I to question the schooling?! I added a glitter and top coat before continuing. Then the base of the dolphins and tree were drawn in black. The tree is a multipart endeavor for the feathering. It's a tad large, too.
White was added to the dolphins and then top coat. When dry the set goes on my board and I start a new set. Next on the list was freehand French as a bridal set using roses and rhinestones.
I ended up using white acrylic for the tips as the white polish was well beyond its use-by date, way too thick. Also, I would have applied a nude base before but, again, what do I know?! You can't top the white tip too much otherwise the tip is no longer white. Duh. So my design in the end will suffer but I think people will get it. My tips are nice, though, even and clean with simple strokes.
They were topped with a pale pink (I secretly topped up the white again, even though they thought it looked good). Then I started my roses. One each in white, then a fill in with different levels of pink. Then a second pink. Then time was up so I will finish tomorrow with leaves, pale background flowers and rhinestones (though I did place a couple of stones). Bye for now! x
Labels:
acrylic paint,
bridal,
dolphin,
freehand,
French,
gradient,
nail art school,
roses,
Thai,
tree
Subscribe to:
Posts (Atom)


